
Fixing a broken QR code in FEZ
13 January 2021 ·I’ve been playing FEZ for the first time recently, and came across this room where some NPCs are constructing a QR code on the wall:
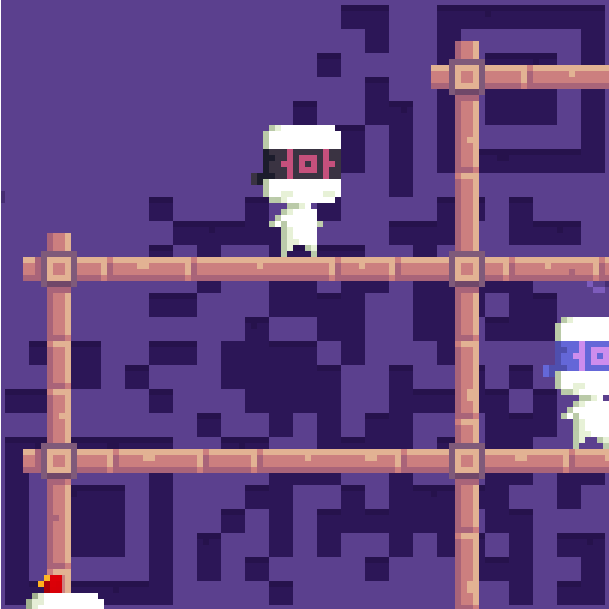
This seemed very likely to be a puzzle. It’s almost a complete QR (most of what’s missing is the top left positioning square), and anything under the scaffolding can be reconstructed, so it stands some chance of scanning after a few fixups.
I imported the screenshot in GIMP. I combined it with another screenshot of the same scene to remove the characters, leaving only the scaffolding. I used the Color Exchange tool (Colors > Map > Color Exchange) to replace the lighter purple color in the background with white. I then used the Threshold tool (Colors > Threshold) to make anything else in the image black.
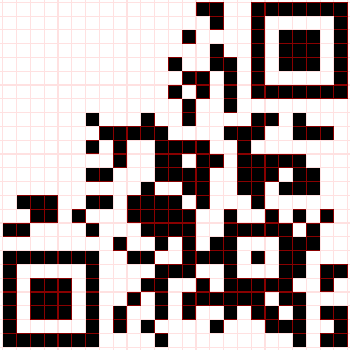
Then, in another layer, I created a grid precisely aligned with the blocks in the image to help me see and fill in the missing portions. GIMP has a tool for that (Filters > Render > Pattern > Grid). I replaced the partial blocks hidden by scaffolding with completed blocks. This result looked like this (the grid is at 25% opacity):
Unfortunately the result still wouldn’t scan, even when I added the third position symbol back to the top left. Too much seemed to be missing, at least for the apps I tried. But since this seemed to be a puzzle that the developers intended you to solve, I assumed there was something more here, so I broke out the QR code spec.
The first thing to understand about QR codes is that they’re relatively simple ways of encoding binary data (ones and zeros) using black (1) and white (0) blocks. Certain parts of the image are only used to align scanners: they don’t contain any data. Other parts contain format information: this tells a scanner what kind of QR code it is and how to decode it. I was hoping this QR code would contain valid format information, as otherwise I’d have to test all the possibilities. Here’s an illustration of the different parts of a QR code. Image credit: Wikipedia.

From the size (25x25), we know this is a V2 QR code, which doesn’t have version information. The first question to answer was whether the QR code still contained valid Format Information. This information is error corrected and duplicated within the image. It appears in the QR code in the sections highlighted in blue:

One of the Format Information bit strings seems complete: it combines the top-right portion with the bottom-left portion. I’m working with the assumption (that I might need to change later) that anything not in the top left quadrant is “finished” by the NPCs, meaning it’s trustworthy. Hopefully this means I won’t need to apply error correction to the Format Information.
Information in QR codes is masked (XORed with a known pattern) to break up large chunks of white or black that give scanners difficulty. The Format Information uses the static mask of “101010000010010”1. Wikipedia incorrectly says this mask is “101011001010101”.2 The data in the QR code will use a different mask, chosen dynamically by the encoder so as to minimize large white or black chunks.
Here is where I began to be surprised by how far I could go using only GIMP. I expected to be importing the data into Python relatively quickly, but being able to toggle masks on the QR code directly and observe the result visually turned out to be very handy.
Using the new “Exclusion” layer mode, you can selectively invert parts of the underlying image using a black and white layer. Take care to observe the correct bit order when creating the mask (MSB: for the Format Information, that means bottom to top, left to right), as seen here:

Applying the mask, we see the following:
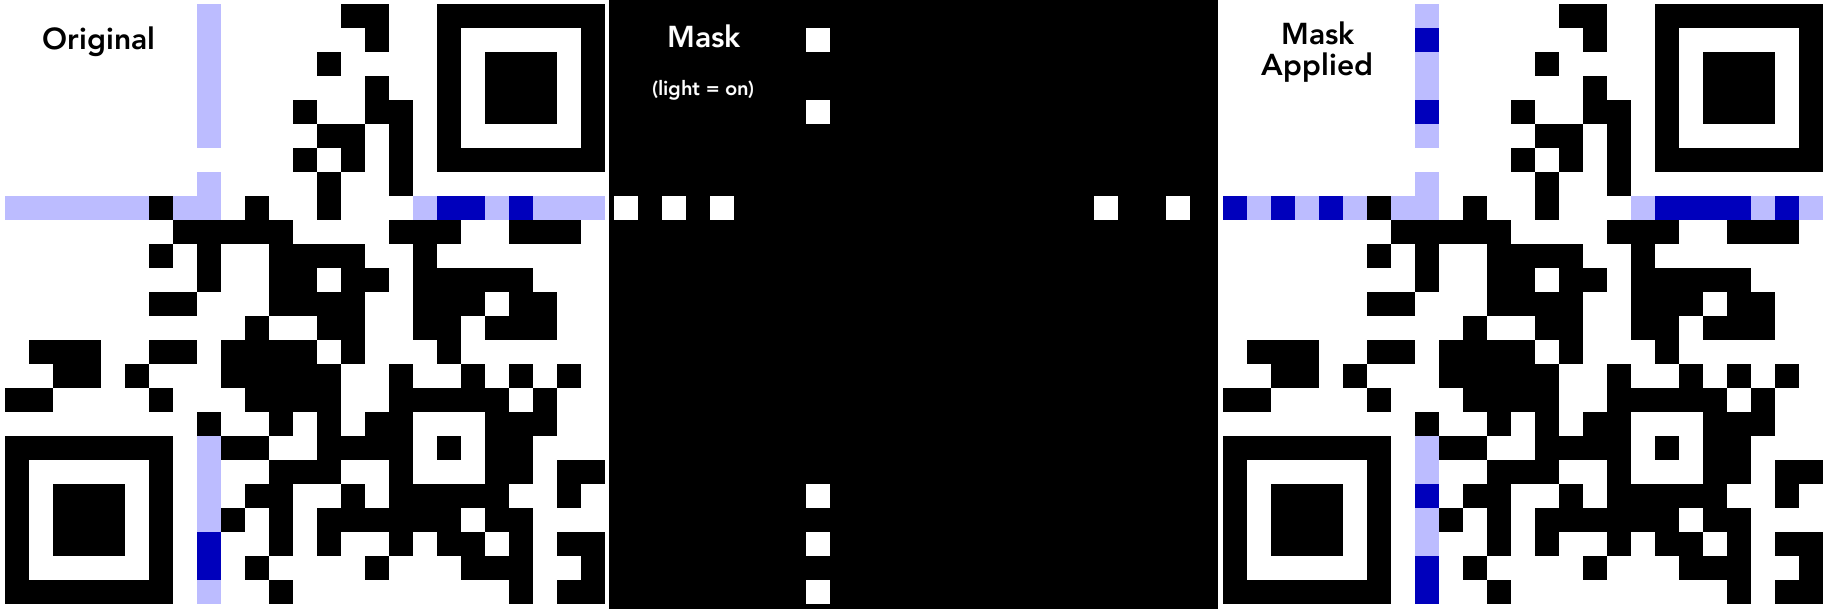
Note that because of the way the GIMP Exclusion layer works, we have to use white as the “on” bit for the mask. Black would be more appropriate since that’s what the QR standard uses for an “on” bit.
According to the spec, the first two bits give the error correction level, and the third through fifth bits give the data mask information. That’s once again in MSB order, so bits 14 and 13, and 12, 11, 10, respectively. In this case, we have “11” for the error correction level, and “001” for the data mask. That tells us that we have error correction level “Q” (which we’re ignoring for now), and “i mod 2 = 0” for the mask (this is one of several options for a mask that is chosen by an encoder). This means that the mask is active (flipping the underlying data bits) for every even number row, starting at 0 for the top row.
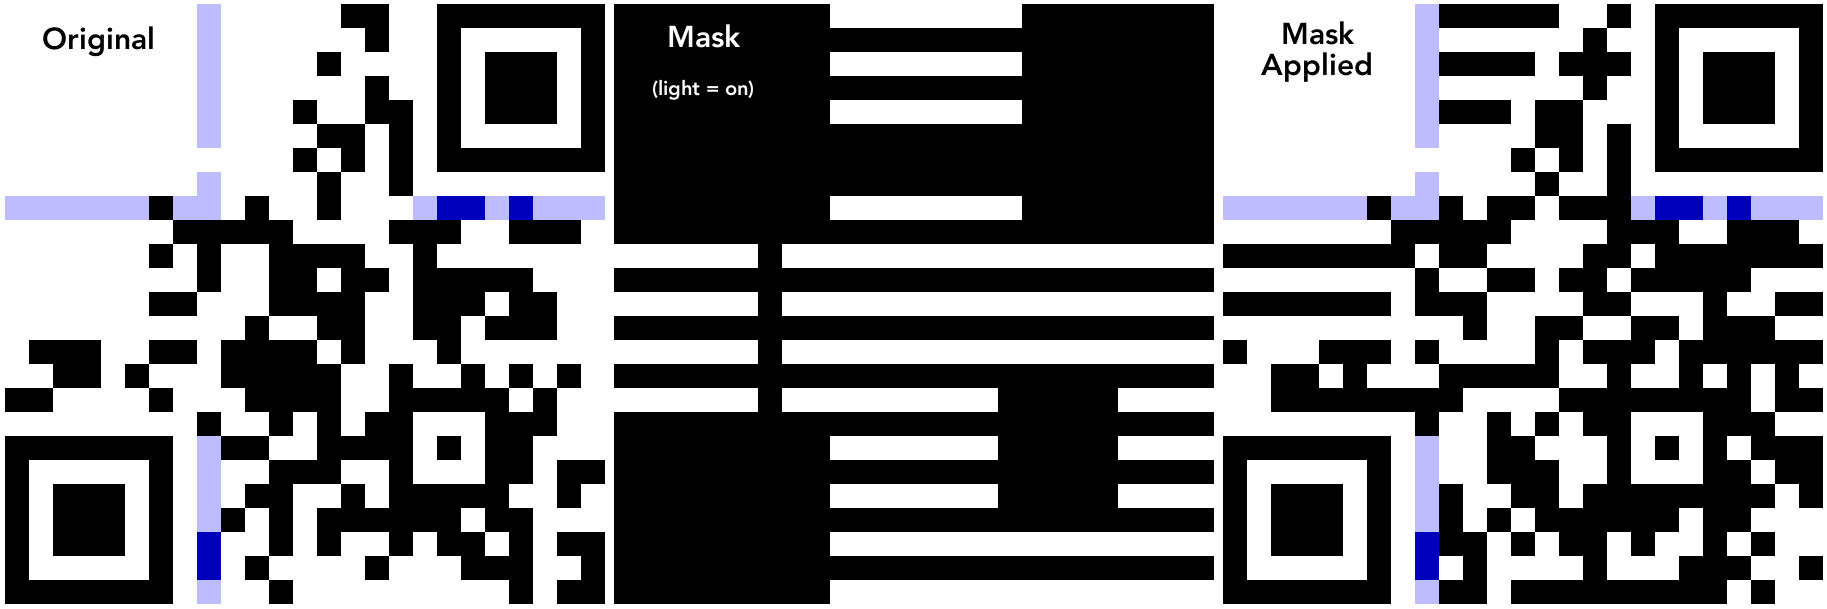
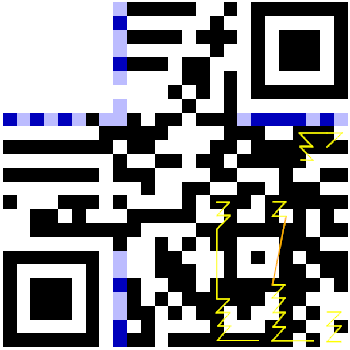
We can quickly create such a mask in GIMP by making a small portion of it (just two blocks, in this case), then expanding that with Filters > Map > Tile. We then trim out any portion that is part of a position symbol, timing symbol, alignment symbol, quiet zone, or Format Information (so that only the data will be masked). The spec (and other references) are pretty clear about what these areas are, so I’ll skip to the result here:
We’re now ready to begin trying to read the raw data! The order of bits is detailed in section 8.7 of the spec. We start with the bottom right block, then go left, then go back and up, then left again, reading upwards in a step-wise pattern. When we reach the position symbol at the top we move to the 2 block wide column to the left, and this time step down. (Discovering that QR code data starts with the bottom right and that it ends with error correction data gave me hope that the QR code was decipherable.) The reading order for the intricate sections is given precisely in the spec. I’ve indicated the interesting parts below.
Section 8.4 of the spec indicates that the data stream is prefixed by a header, where the first four bits are a “mode indicator”, followed by a length indicator. If you’re just encoding raw binary data in a QR code, you may as well just use 8 bit bytes, which is mode “0100”. But if you’re representing numeric or alphanumeric data, you can encode it more efficiently. The FEZ QR code begins with “0010”, which indicates an alphanumeric QR code.
This means that the next 9 bits (for a V2 QR code) are used to give the number of characters in the data. The next 9 bits of our QR code are “000010111”, which is the number 23 represented in binary.
For maximum efficiency, alphanumeric mode encodes 45 possible characters into blocks of 2 characters per 11 bits. (45^2 / 2^11 ≈ 98.9%, which is pretty good efficiency). To access the characters, we divide the 11 bit integer by 45. The result without the remainder is the first character, and the remainder is the second character.3
Each number represents a character according to its position in the following string:
0123456789ABCDEFGHIJKLMNOPQRSTUVWXYZ $%*+-./:
Note that we have an odd number of characters, so to save every bit possible the last character will be encoded as a single 6 bit value, instead of wasting another 5 bits.
With all this information in hand, we can transcribe the data from the QR code. Anything after the last piece of data will be part of the error correction bits, which we’re hoping we don’t need. Now that we know how much data there is (22 × 11 / 2 + 6 bits), we can also identify each portion of the QR code by its function:
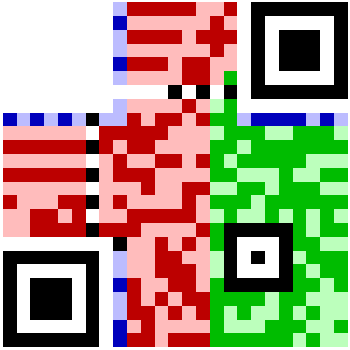
Blue represents Format Information (as before). Green represents data. Red represents error correction. Anything purely black or white is a static part of the QR code.
I have transcribed the data like so:
10011011100: 27 29 (R T)
11001101111: 36 27 (Space R)
10100111101: 29 36 (T Space)
01111001110: 21 29 (L T)
11001101111: 36 27 (Space R)
10100111101: 29 36 (T Space)
01111001110: 21 29 (L T)
11001101001: 36 21 (Space L)
10100111101: 29 36 (T Space)
01111001110: 21 29 (L T)
11001101111: 36 27 (Space R)
011101: 29 (T)
In other words, the data says “RT RT LT RT LT LT LT RT”. This is a sequence of inputs you can make with the controller in FEZ. You usually receive a collectable for doing so.
I also wrote some Python code to do the decoding automatically, which you can find here: fez_qr.py.
With all the information we now have, we can actually generate the final, corrected version of the QR code. To do that, we’ll need a library that allows us to set the parameters manually (because an automatic QR code creation tool might choose a different mask or error correction level, giving a completely different result). I used the one here. Exporting the resulting SVG and layering the result on the original, we can see that it’s nearly a perfect match!

Having finished all this, I reopened FEZ, and entered the input sequence. And NOTHING HAPPENED. I tried multiple times to make sure I wasn’t screwing anything up.
I looked up the puzzle online, and apparently a completed version of the QR code is in a later stage of the game, and this unfinished one is just for “lore”. I find this explanation frustrating, because it clearly seems to have been designed so that an enterprising person could reconstruct the code themselves. Everything you need is there. Yet I have to admit… it doesn’t work. You can’t enter the code in this room, you have to enter it elsewhere.
I think this is a mistake on the game designers’ part. If a puzzle gives you everything you need to solve it, the solution should work. It’s rather frustrating to put that much effort into solving a puzzle only to find out that your effort wasn’t anticipated, and the puzzle is actually solved for you later in the game.
-
According to section 8.9 of the QR code specification. ISO/IEC 18004:2000. ↩
-
As of 11 January 2021. https://en.wikipedia.org/w/index.php?title=QR_code&oldid=999748921#Encoding ↩
-
It’s pretty easy to understand how this works. In a base 10 system, you can “encode” 2 characters out of a set of 10 possible characters in a 2 digit number: “12” for example. Dividing by 10 and ignoring the remainder gets you back the first character (“1”), and dividing by 10 and taking the remainder gets you the second character (“2”). This system works exactly the same, it’s just that it’s a base 45 system. If we used base 45, you’d be able to just read off the two characters after printing the number. ↩